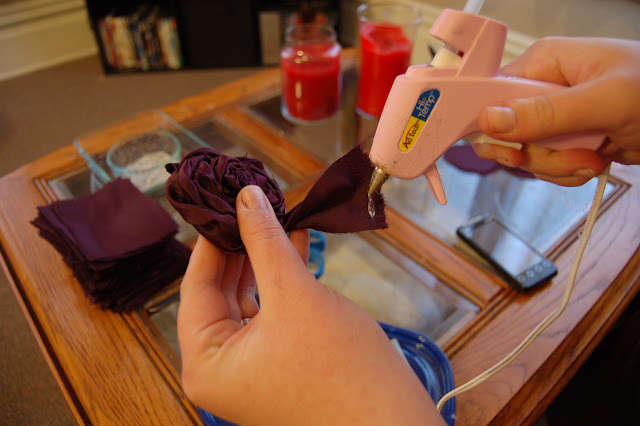
These roses are beautiful, however, frustrating at first. I suggest trying them with a cotton-like fabric to get the hang of it before trying them with satin or any kind of "slippery" fabric. They can be made from just about any fabric, I haven't found a type that it doesn't work well with.
First, cut your fabric into a strip about 2 inches wide (I am using 44 inch wide fabric for this, so my strips are 2x44 inches). This can be adjusted depending on your need and how thick/how big around you want your roses to turn out. The thicker your fabric strip, the harder it is to control. NOTE: The thinner your fabric, the more length you will need to get the desired bulk/circumference. You can glue two strips together, end to end, to create a rose that is bigger around.
Next, fold the strip in half (good side out), and tie a knot in one end.
Place a drop of glue on the knot, and fold over.
Next, roll the knot inward, working down the folded strip of fabric.
Place a drop of glue as you roll the knot inward, rolling one and a half times around. This will be the center of your flower.
Place another drop of glue at this point to anchor your starting point. Now, you begin the tricky part! Twist the remaining "tail" of fabric, flipping once to place your cut edges at the top.
Place a drop of glue AFTER the twist, and roll to secure to your center.
This is kind of what yours should look like at this point
From this point on, it will be easiest and least frustrating for you to apply your hot glue to the center of your flower rather than on the tail of your fabric. Continue to twist, roll and glue your fabric while working around to create your rose. This takes some practice, don't get too frustrated! Don't roll your fabric too tightly, or you'll end up with a disc rather than a rose. Like I said, it takes some practice and this works differently for different fabrics.
If you roll your fabric with too much slack, your flower will fall apart. It's an easy fix, though, so don't give up! If your fabric is too loose, simply slide your flower apart where the fabric is too lose. Place a drop of glue and slide the flower back together and let the glue cool. Problem solved!
Continue rolling, twisting and gluing until you have about 2-2.5 inches left of your strip.
Now, take the tail of your fabric and apply a strip of glue to the backside of it. Then pull it down over the back of the flower to close it off.
Now, flip over your flower. You'll notice some strands of material coming out of the top. Trim these VERY CAREFULLY with scissors. If you accidentally cut the fabric, it's OK! Don't panic. We'll cover that in a minute.
Now, light a candle.
Holding the rose above the flame, singe off the extra threads. Be careful of your fingers!
If you see other things catching fire, you may want to call in some backup.
Your flower should look something like this
Now you're ready for your centers! Buttons make AWESOME centers for these flowers; the little loop on the back of the button works great in the folds of the flower. You can also sew them on by sewing through the middle of your rose. But, hot glue works great in any case.
Be careful of your fingers when you're hot gluing! Or, you'll end up with this
After you've applied the neosporin and a pretty little bandaid, you can finish gluing your centers
Now you can sit back, baby your fingers, and enjoy your beautiful creations!


No comments:
Post a Comment